Benefits of using CLI on AWS
In Today’s Article, we will be seeing how Using Command Line Interface (CLI) is more beneficial and powerful than Graphical User Interface (GUI) on the AWS platform. CLI is better on other major platforms as well.

Using AWS is seamless with CLI, it is a a unified tool to manage your AWS services. With just a few lines of codes, we can download and configure, control multiple AWS services from the command line and automate them through various scripts (like BASH, SHELL, etc.).
So, everyone has worked on the GUI for using many programs and commands. On clicking the Application Icon, we launch them, we use their services and everything. GUIs are easy to use, easy to understand, but it is time taking. We have to do lot of manual work in order to get any results. The GUI is not customizable and we have to use their UI given to us, on a supported platform or else it wont run work.
Suppose, in AWS we have a requirement to use EC-2 service to make Multiple instances at the same time. This is not efficient as we would have to launch a single instance at a time because that’s what the GUI supports.
To Launch an Instance through GUI, we need to manually select AMI, select Instance type, configure instance settings, add storage size (or attach EBS), add tags, give security groups and then launch the Instance

But with CLI commands, we can just launch multiple instances at a single time in a single line. This goes for other AWS services as well. Usually, GUI don’t have the capability to change the OS configuration, but we can execute them from CLI. AWS Web-UI is not as powerful as CLI. Some requirements are met only by CLI rather than the Web-UI.
In CLI , if we set the path of program in environment variable then we can use the program name and execute it on terminal. Here, we can create the entire code from scratch and use in-built functions.
Installing AWS CLI in CMD :
So, just as Web-UI requires browser like chrome for establishing connection, in the same way, CLI requires Command Prompt or Terminal.
To install AWS CLI in our own Command Prompt, we can easily download it from the link below. We will be using AWS CLI versions 2. This installation process is pretty simple and is just a few clicks.
After installing AWS CLI in our Command Prompt, we can check if it is installed or not by running command __> ‘aws - -version’, which should show the latest CLI version. Then we configure the CLI. To configure AWS CLI, we require AWS Access Key ID and AWS Secret Access Key in order to use AWS services. AWS CLI installation also installs SDK.
What is Access Key ID??
Key pair is like a password which we have in local os without which we cant login to our AWS Account.
So, to get these keys, we require an IAM user. ‘IAM’ or Identity and Access Management is an AWS service through which we can make multiple users in the same account but with limited permissions to the users.
For this, initially we go in our AWS account from GUI and create an IAM user. Just select IAM from Security, Identity, & Compliance in Services. While creating an IAM user, we give AWS access type - programmatic access, so that we can use CLI.

Next, when setting permissions, we give Power user access from Existing Policies, so that out CLI will be able to use every AWS service.
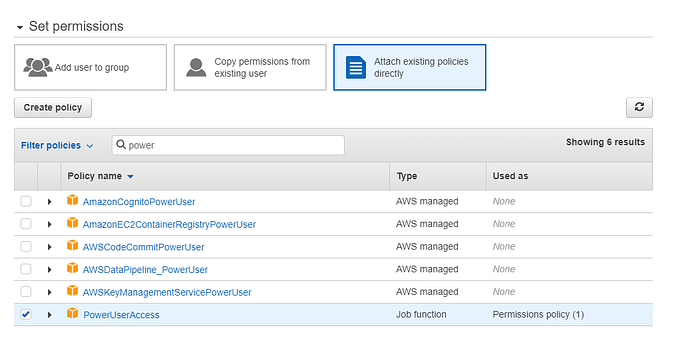
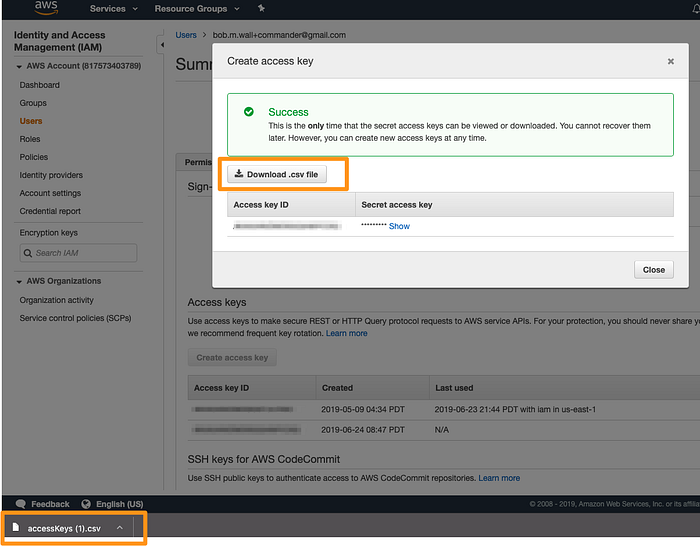
Once the IAM user is created, we will get a CSV file which we download. This CSV file contains our AWS Access Key ID and AWS Secret Access Key.
Once this step is done, now we are ready to setup our AWS CLI in the Command Prompt. This is only required for the first time when we Login to the CLI, after that it will automatically Login.
In the Command Prompt, after checking AWS CLI is successfully installed, we enter command __> ‘aws configure’. This command starts AWS and asks for the AWS Access Key ID and AWS Secret Access Key, which we acquired from the .CSV file. It also asks for Region we want to work in and Output Format. Set ‘Output Format’ : json
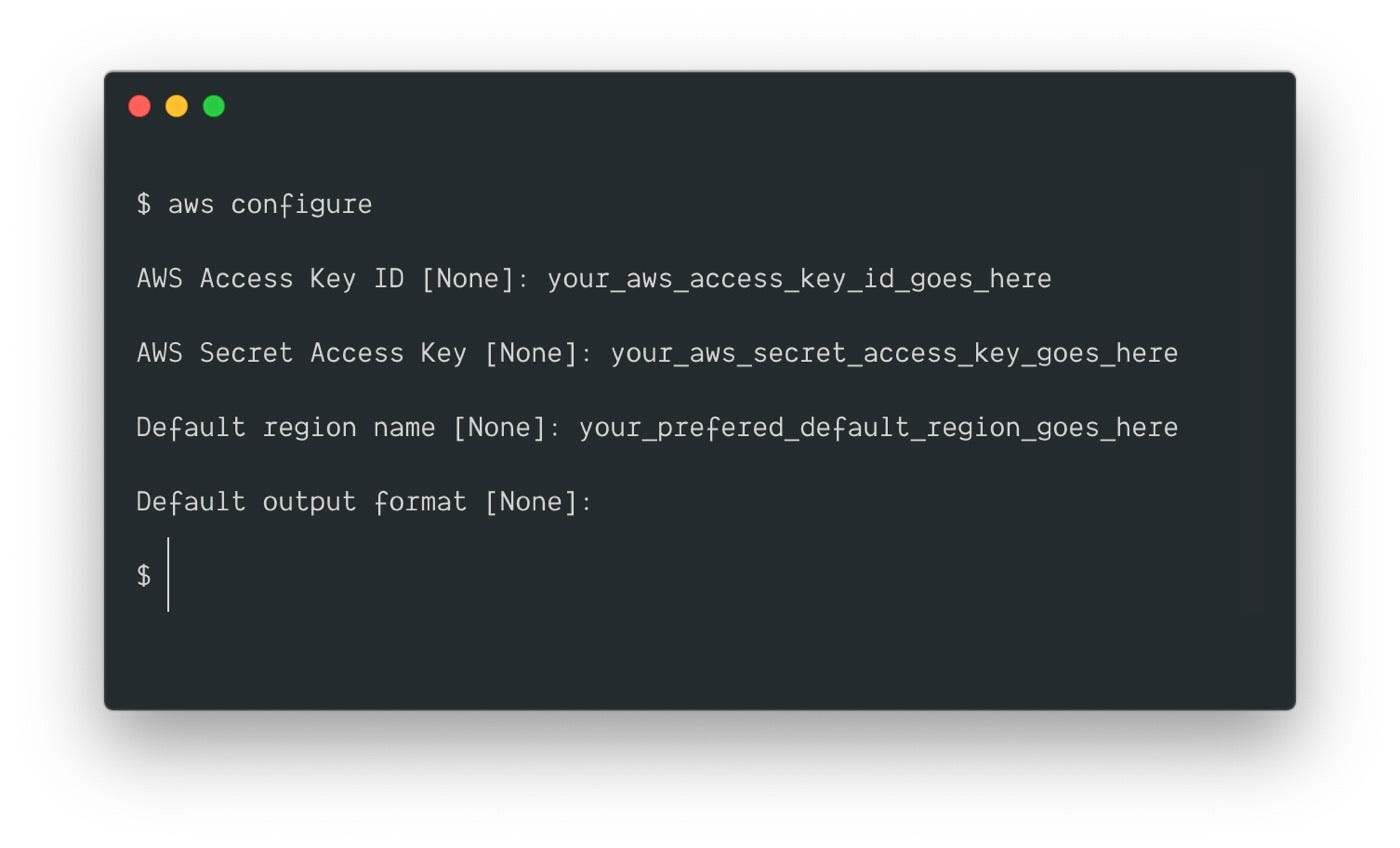
Once this is entered, we can manage and perform all AWS services using CLI. This logins us into the IAM user.
Set-up for EC-2 instance :
For setting up our EC-2 instance from CLI, we require a Key Pair. Key Pair is like a password which we have in local OS, without which we cant login to our EC-2 instance. This key is the same as the key that we attach in Authentication during remote login from Putty.exe. __>
aws create-key-pair - -key-name test - -query “keyMaterial” > your_key_name.pem
This command saves the Key to our Local System.
Next, we setup Security group for the Instance __>
aws ec2 create-security-group - -description “_description you want to give_” - - group-name name_youwant_to_give

Once this setup is done, we can launch or Instance by attaching the created Key-pair and Security group.
To Launch the EC-2 instance __>
aws ec2 run-instances --security-group-ids sggroupid --instance-type instance type(egt2micro) --image-id ami id --key-name key name --count no of instance you want to launch --subnet-id subnetid
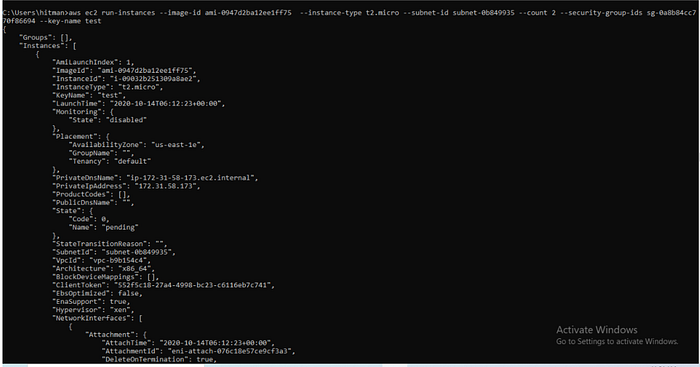
Here, we are attaching Security groups, instance AMI id , instance type, the count of instances. All these IDs are visible where we first created Instance from Web-UI.
Eg) The AWS AMI Amazon Linux 2 AMI has ID -ami-0947d2ba12ee1ff75. Like this can see each and every ID of every setup for EC-2 Instance.
After Launching the Instance, we see above each and every detail of the Instance Created. Such detailed info is not available in Web-UI. That is why CLI is more powerful.
Now, let us add launch and attach EBS storage to the Instance we launched. EBS volume is a block storage service designed for use with Amazon Elastic Compute Cloud (EC2)
To Launch EBS Service from CLI __>
aws ec2 create volume --volume-type type you want (eg gp2) --size sizeyouwant --availablity-zone zoneinwhichyouwanttolaunch/same_as_ec2

After creating an EBS volume, we attach it to our instance __>
aws ec2 attach-volume --volume-id yourvolumeid --instance-id yourinstanceid --device devicename

In this way, we attach our EBS storage to our Instance.
We can even view all the instances running in our system > “aws ec2 describe-instances” - shows all instances and all their details.
We can find all the AWS commands with ‘aws help’ command. Suppose we are creating an instance and we are stuck at a point, just write the above command(‘aws ec2 help’). It will show all the sub-commands and operations / parenthesis related to aws ec2. Still, if any error is faced during the installation process you can refer the following Documentation.
So, using such commands and following all synopsis, we can perform not just EC-2, but all the other AWS services just from CLI as well.
Hope you learnt the basics of AWS CLI and its benefits !!
Thank You for reading this Article !!
#awscloud #awscli #aws #vimaldaga #righteducation #educationredefine #rightmentor #worldrecordholder #linuxworld #makingindiafutureready #righeudcation #arthbylw #awsbylw
